These aren't the prettiest in the world because they have been made from reclaimed construction 2" X 4"s. What's nice though I think, will be the price tag of a 20.00 donation to St Jude's Children's hospital plus shipping for a set of 4 of these vehicles. I tried to be a little creative with the painting to give the vehicles some flair.
Monday, March 30, 2020
Sunday, March 22, 2020
Saturday, March 21, 2020
The Phoenix
The Phoenix.
I am not sure if anyone is into carvings like this. I just wanted to do something a little different.
This piece was done from a puzzle pattern but I wasn't liking how the pieces were locking together. So I kept it simple with just the Phoenix coming from the fire as 2 pieces.
Thanks for looking.
Check out https://www.etsy.com/shop/MacsFarsider if you get a chance.
I am not sure if anyone is into carvings like this. I just wanted to do something a little different.
This piece was done from a puzzle pattern but I wasn't liking how the pieces were locking together. So I kept it simple with just the Phoenix coming from the fire as 2 pieces.
I really played with the painting to make the flames look somewhat realistic. The colors anyways.
Thanks for looking.
Check out https://www.etsy.com/shop/MacsFarsider if you get a chance.
Pieces like this will be posted for a donation to St Judes Children's Hospital.
Friday, March 13, 2020
Winnie The Pooh Themed Wall Art For Charity Donation
Description
This item isn't being sold. A donation is being asked for. The amount from the donation above cost for materials for this piece will be donated to St Jude's Children's hospital in the buyer's name and a receipt will be provided to the buyer showing that the donation was made through an email to the email account that the user has with Etsy.
This beautifully crafted Winnie The Pooh Inspired design has been wood burned into a piece of 1" x 8" cherry wood. The picture was found surfing the web. I do believe it was an original illustration.
After the oval was cut it was rounded over with a .25" router bit, sanded smooth with up to a 200 grit paper and then coated with Boiled Linseed Oil. After the oil was dry, it was again sanded and then several coats of polyurethane were applied on both the front and back with sanding between coats.
A hey hole slot was routed into the back for the ease of wall mounting this piece of art.
It hangs very well on something as simple as a double-headed tack.
Saturday, March 7, 2020
Custom Made Cradle For Our First Grandchild.
Custom Made Cradle For Our First Grandchild.
The Super Secret Project that I have been working on.
I started by searching the internet for ideas and measurements.
It's amazing how every set of plans for making a cradle for a baby has to be purchased. Anything decent on Amazon cost about 20 bucks. Then the purchase wasn't virtual. The plans had to be shipped. Understandable if the plans were full-sized for making patterns but most weren't.
So actually the Saturday, the 9th of February, 2020 is the day I made the plans and templates for the cradle. It's also the night that my intestines shut down. The following day I ended up in the hospital.
The materials, all cherry wood arrived while I was in the hospital.
The Day after I got out I started rough-cutting the parts for the cradle.
The Day after I got out I started rough-cutting the parts for the cradle.
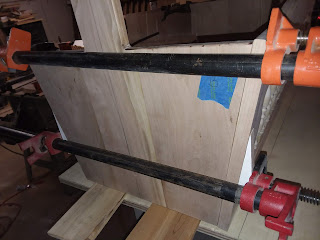
Headboard and footboard glue-ups. The Jointer is on them to keep them weighs about 30lbs. A good weight to keep the glue-ups flat.
Head and footboards being glued up and clamped.
The Side Rails.
Setting up a support leg.
The base for the support.
Double-checking the Spindle size
I was going to use biscuits but decided that dowels would be stronger.
Over 36 years ago, I built a changing table using the same doweling jig and many other tools that I use today. The changing table was for our son, our first grandchild's Father.
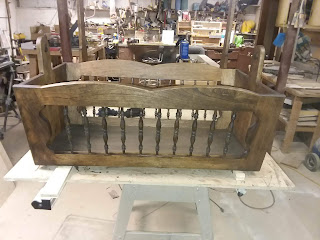
One side dry fitted.
Glue-up and clamped.
Sides built.
I designed the curve designs on the fly during the build. Made patterns to keep every piece matching.
All square edges have been rounded over with the router.
I designed the curve designs on the fly during the build. Made patterns to keep every piece matching.
All square edges have been rounded over with the router.
The build commences.
Again with the dowels for the joints. This joint will be one of the most stressed on the entire Cradle.
Nice and tight.
One never has enough clamps. This required old school methods.
And let's do it again.
Both supports for the cradle built
Installing the Head and Footboards. I biscuited these onto the side rails.
More clamping.
All glued up. I use wedges to provide a flat edge for the clamps.
The base installed.
Cradle Supports are ready for the install. Almost.
Cradle Swing bearings installed.
Cradle swing stop installed.
Final sanding with 200 grit, cleaned with alcohol and now for applying the stain.
Stain color, Walnut.
Wax on, wax off method of staining.
I purchased these large flat head bolts to use when putting the cradles supports spreader together.
Cradle Support Complete
My own little invention.The Rocker Stopper
4 coats of a polyurethane finish.
Rubber feet for the legs.
Cradle Completed.
Took a week's labor and close to $400.00 for the materials. The mattress should be here tomorrow.
Subscribe to:
Comments (Atom)


